Angry Birds
And Face Painters
Article was written for facepaint.com and not published
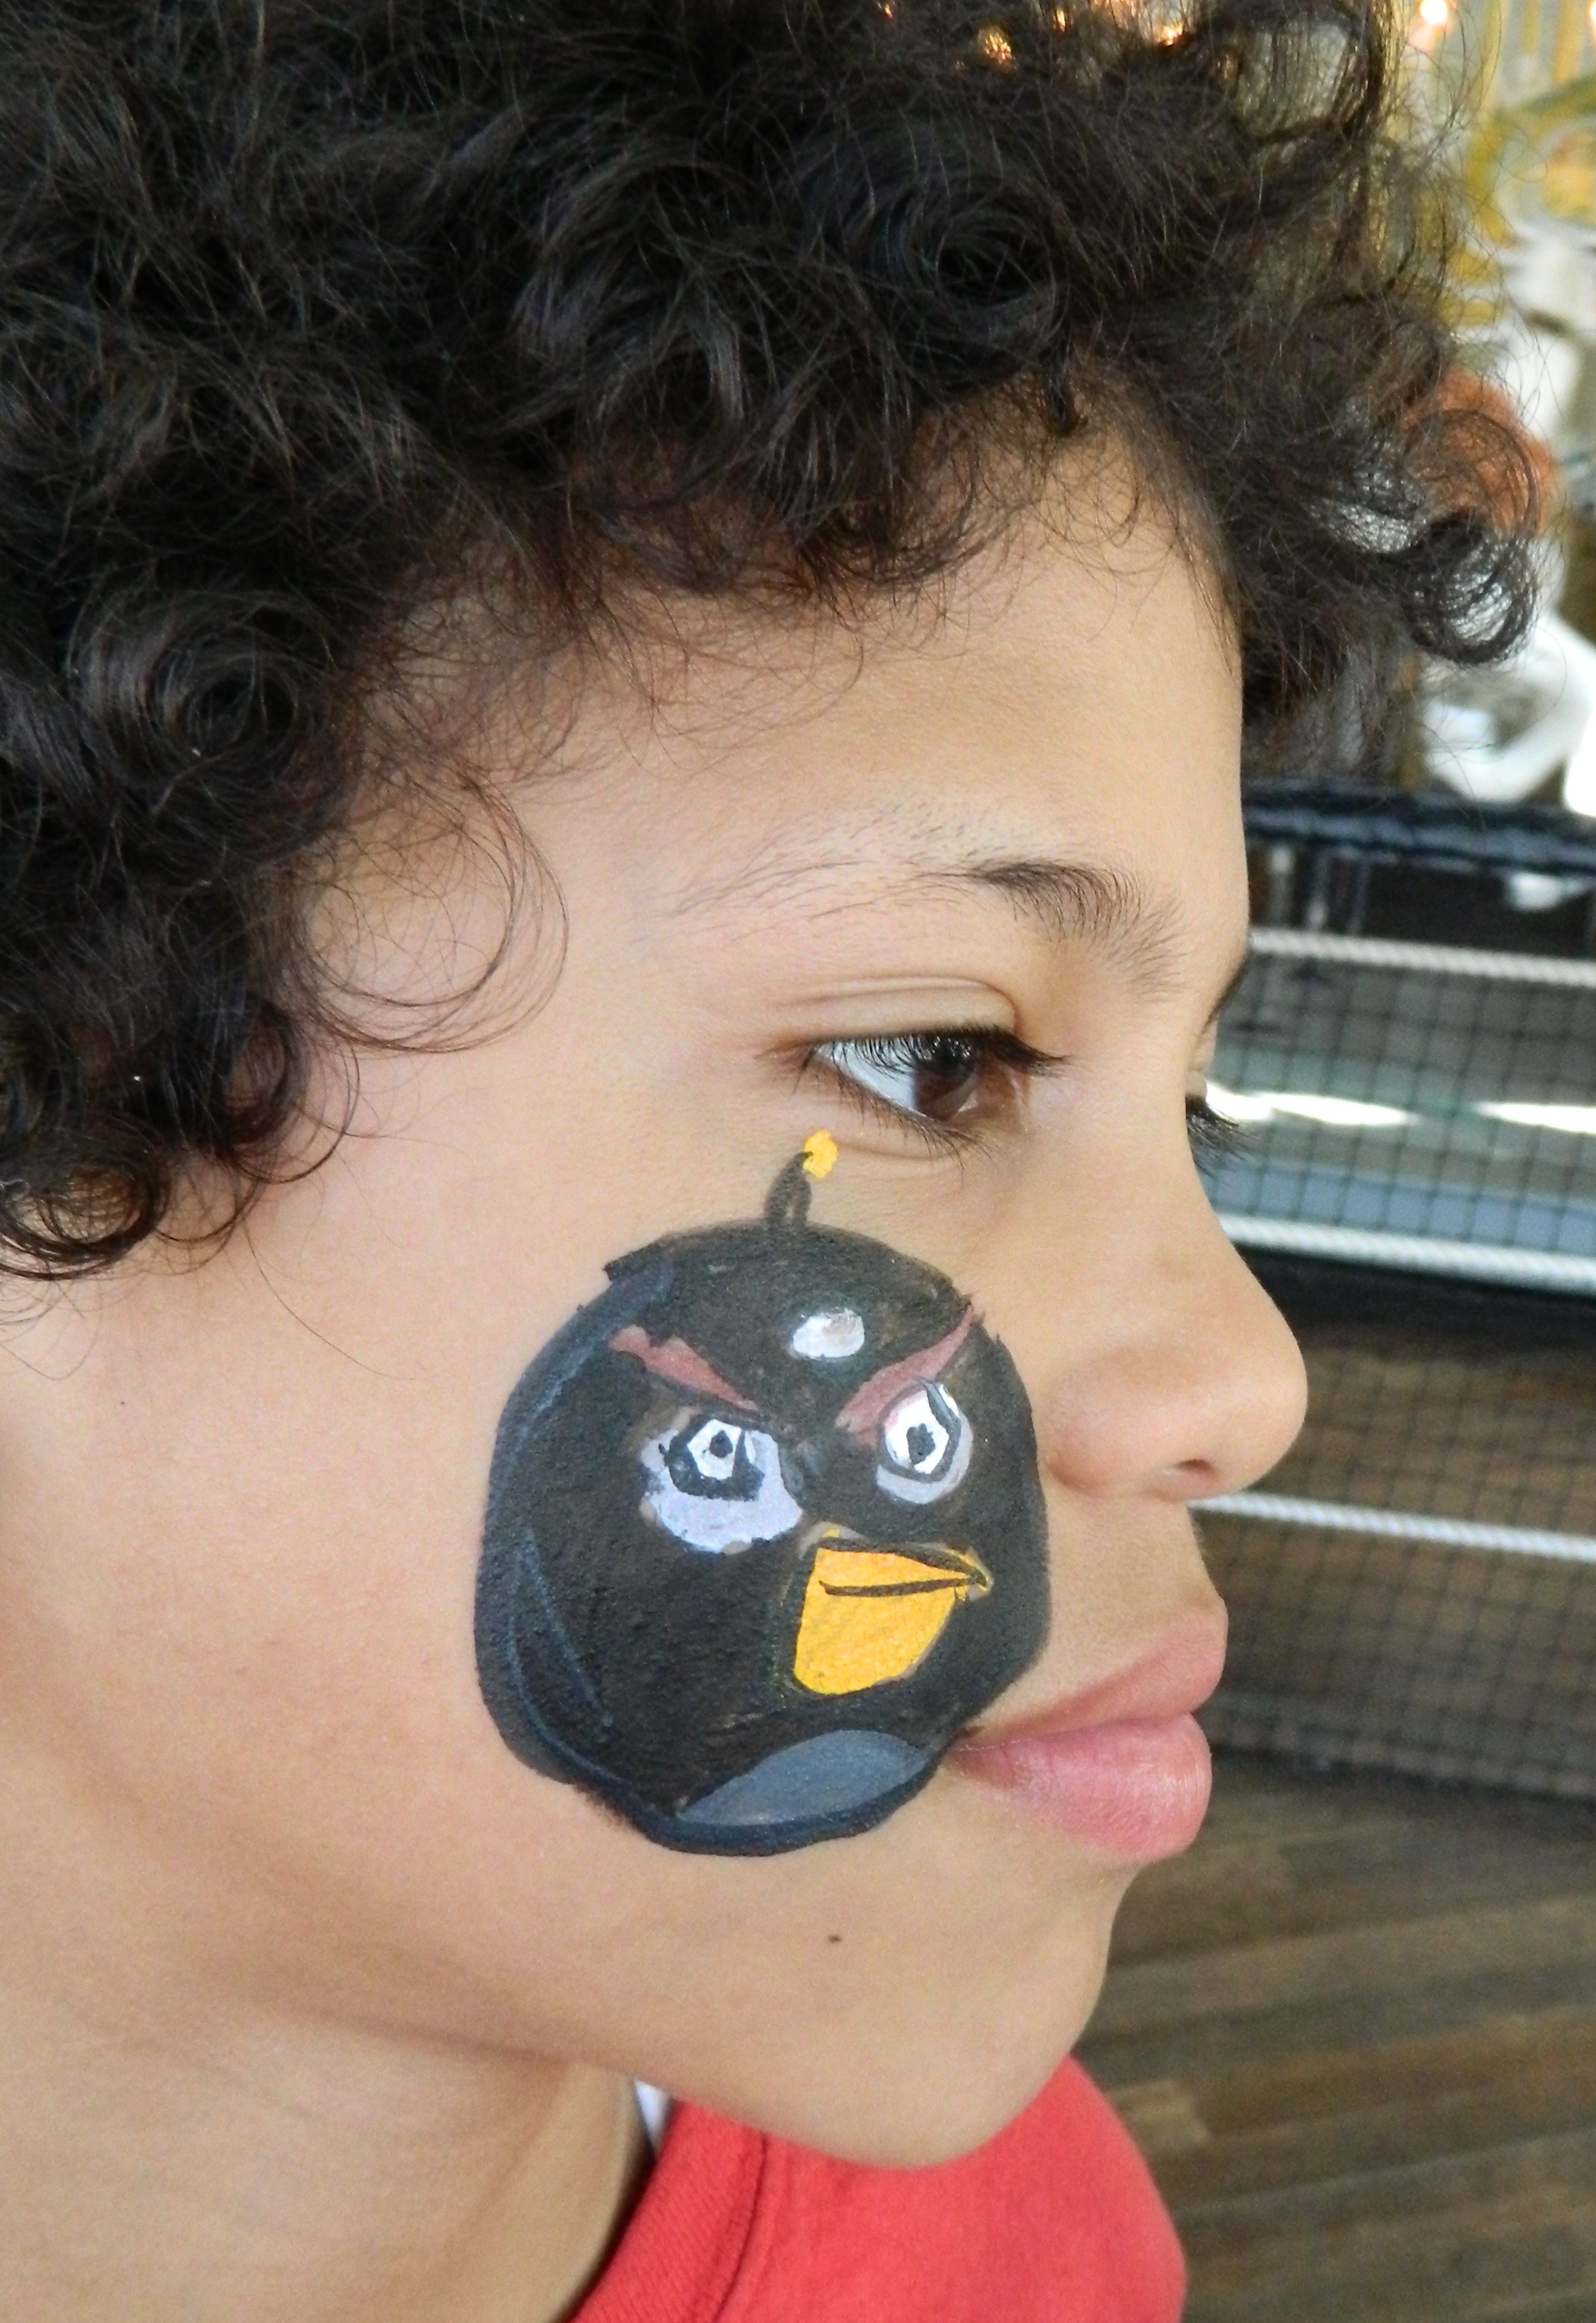
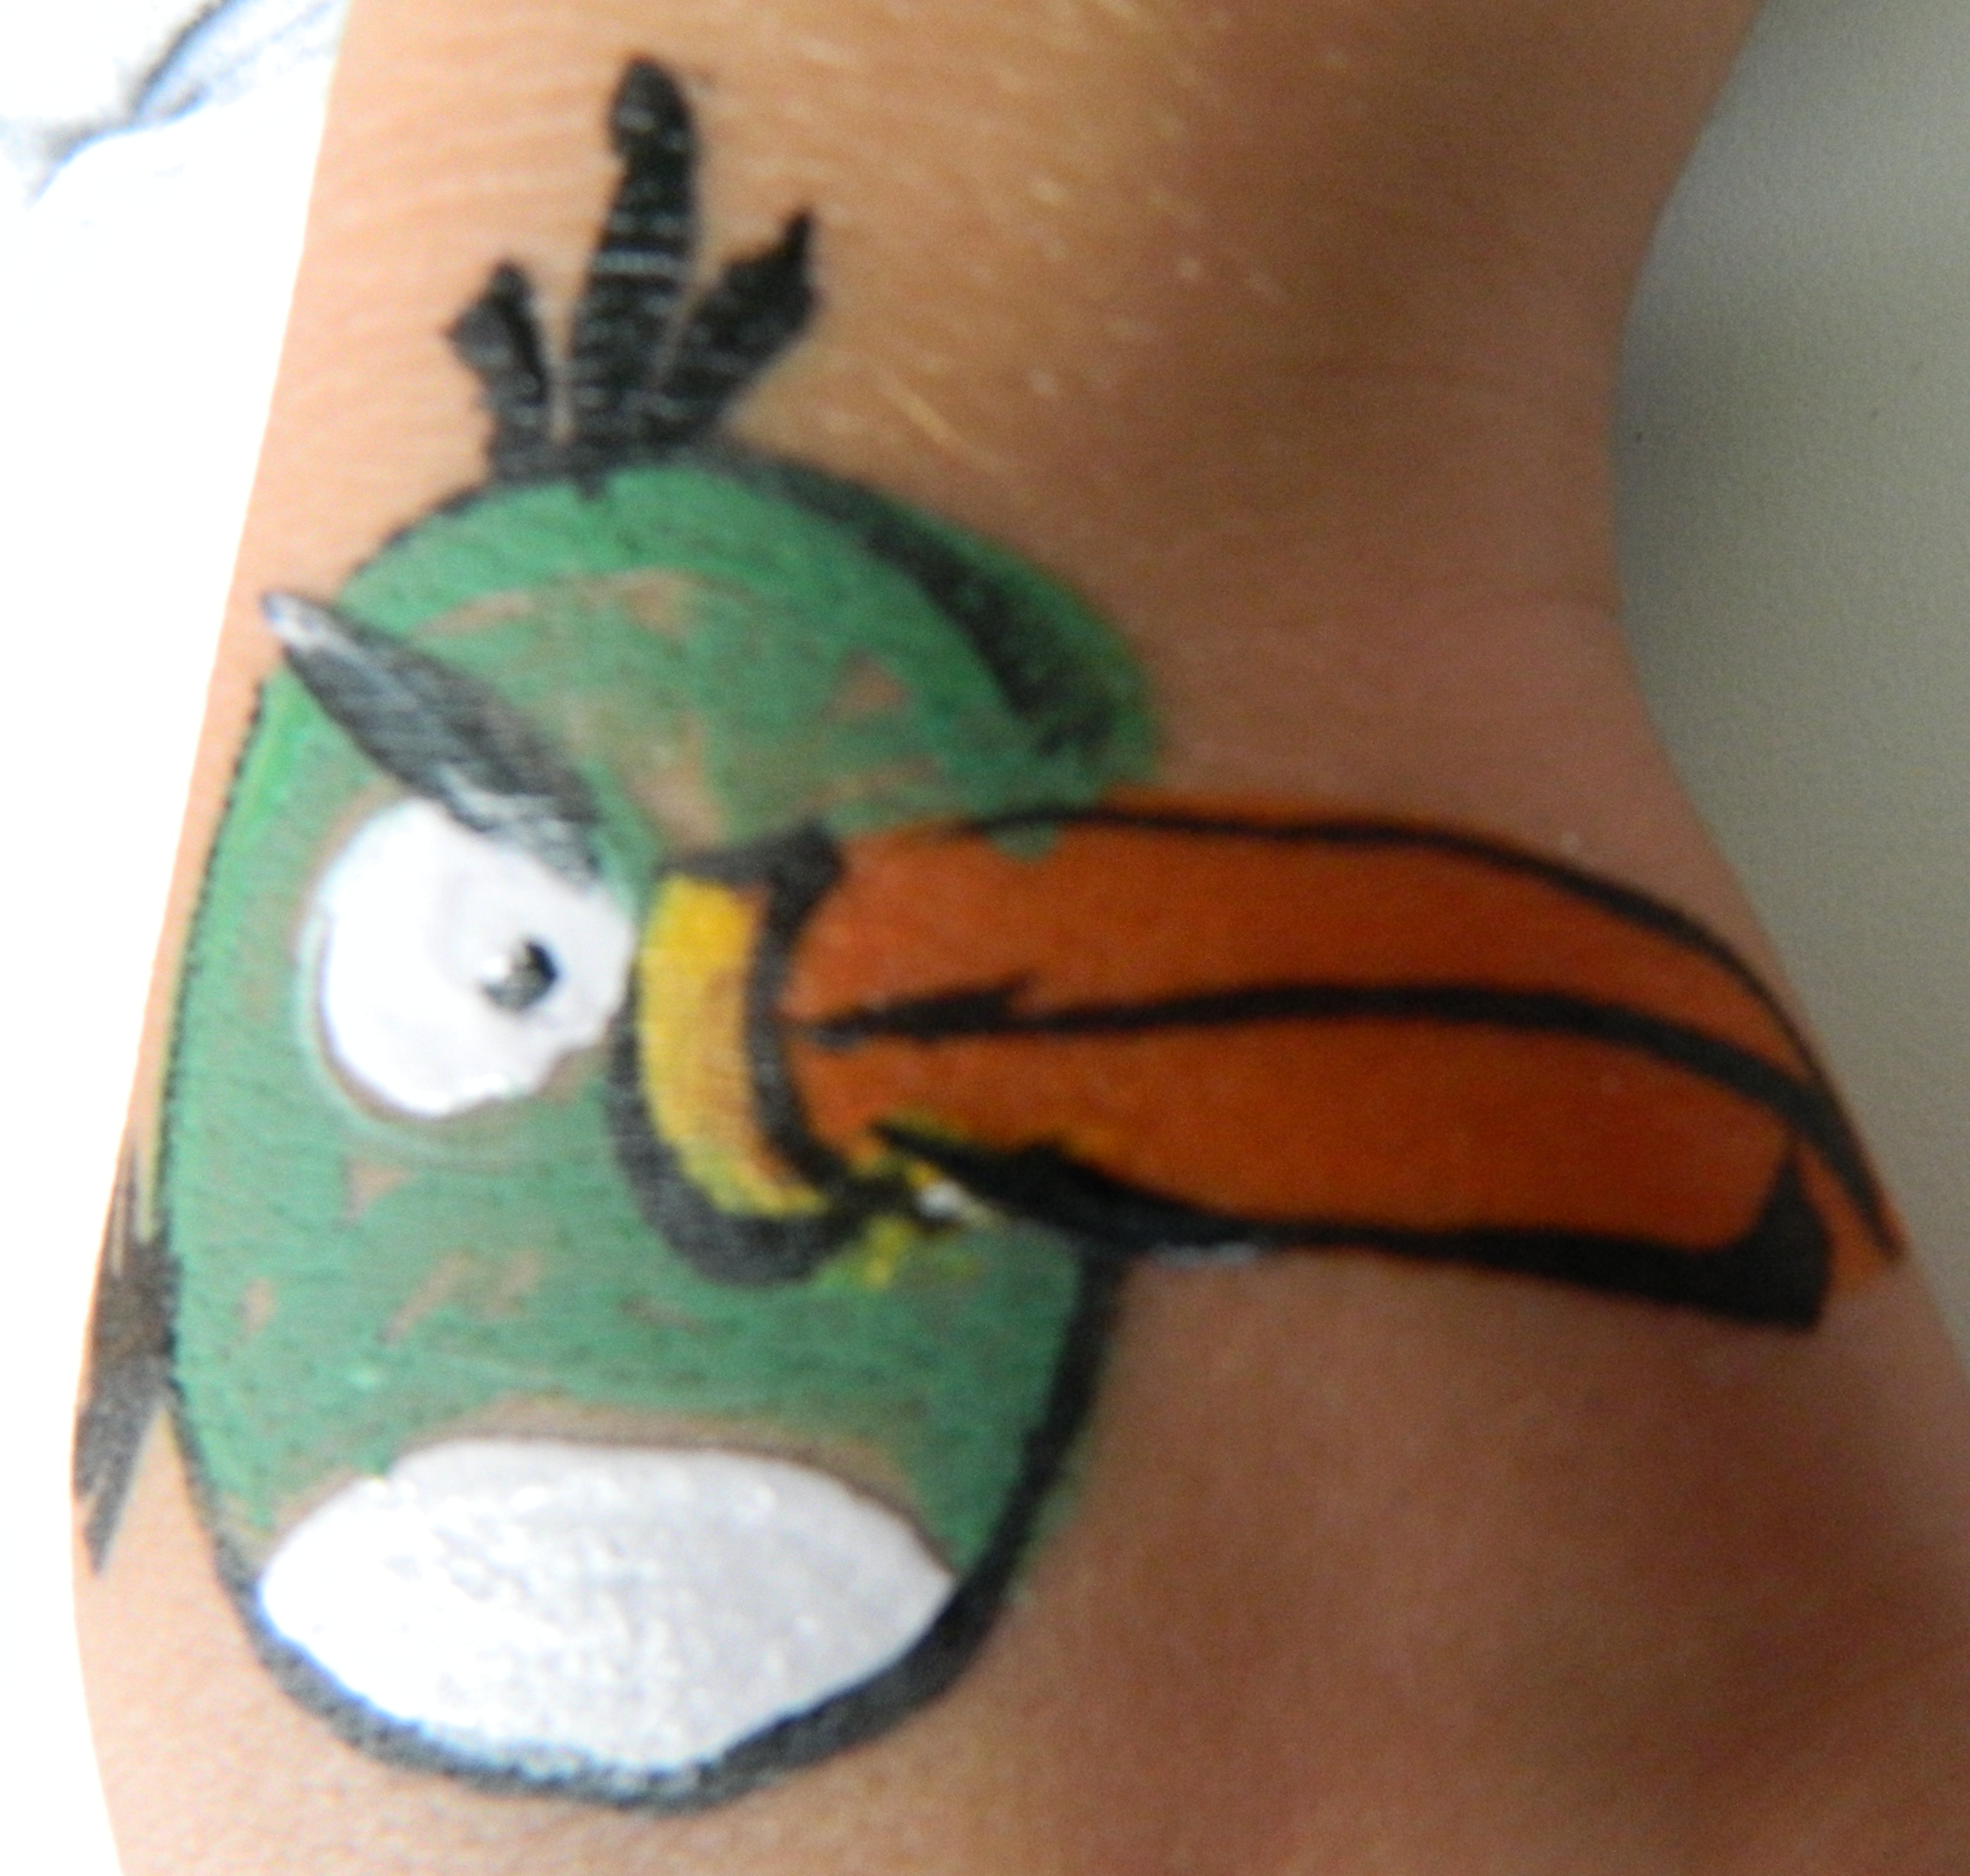
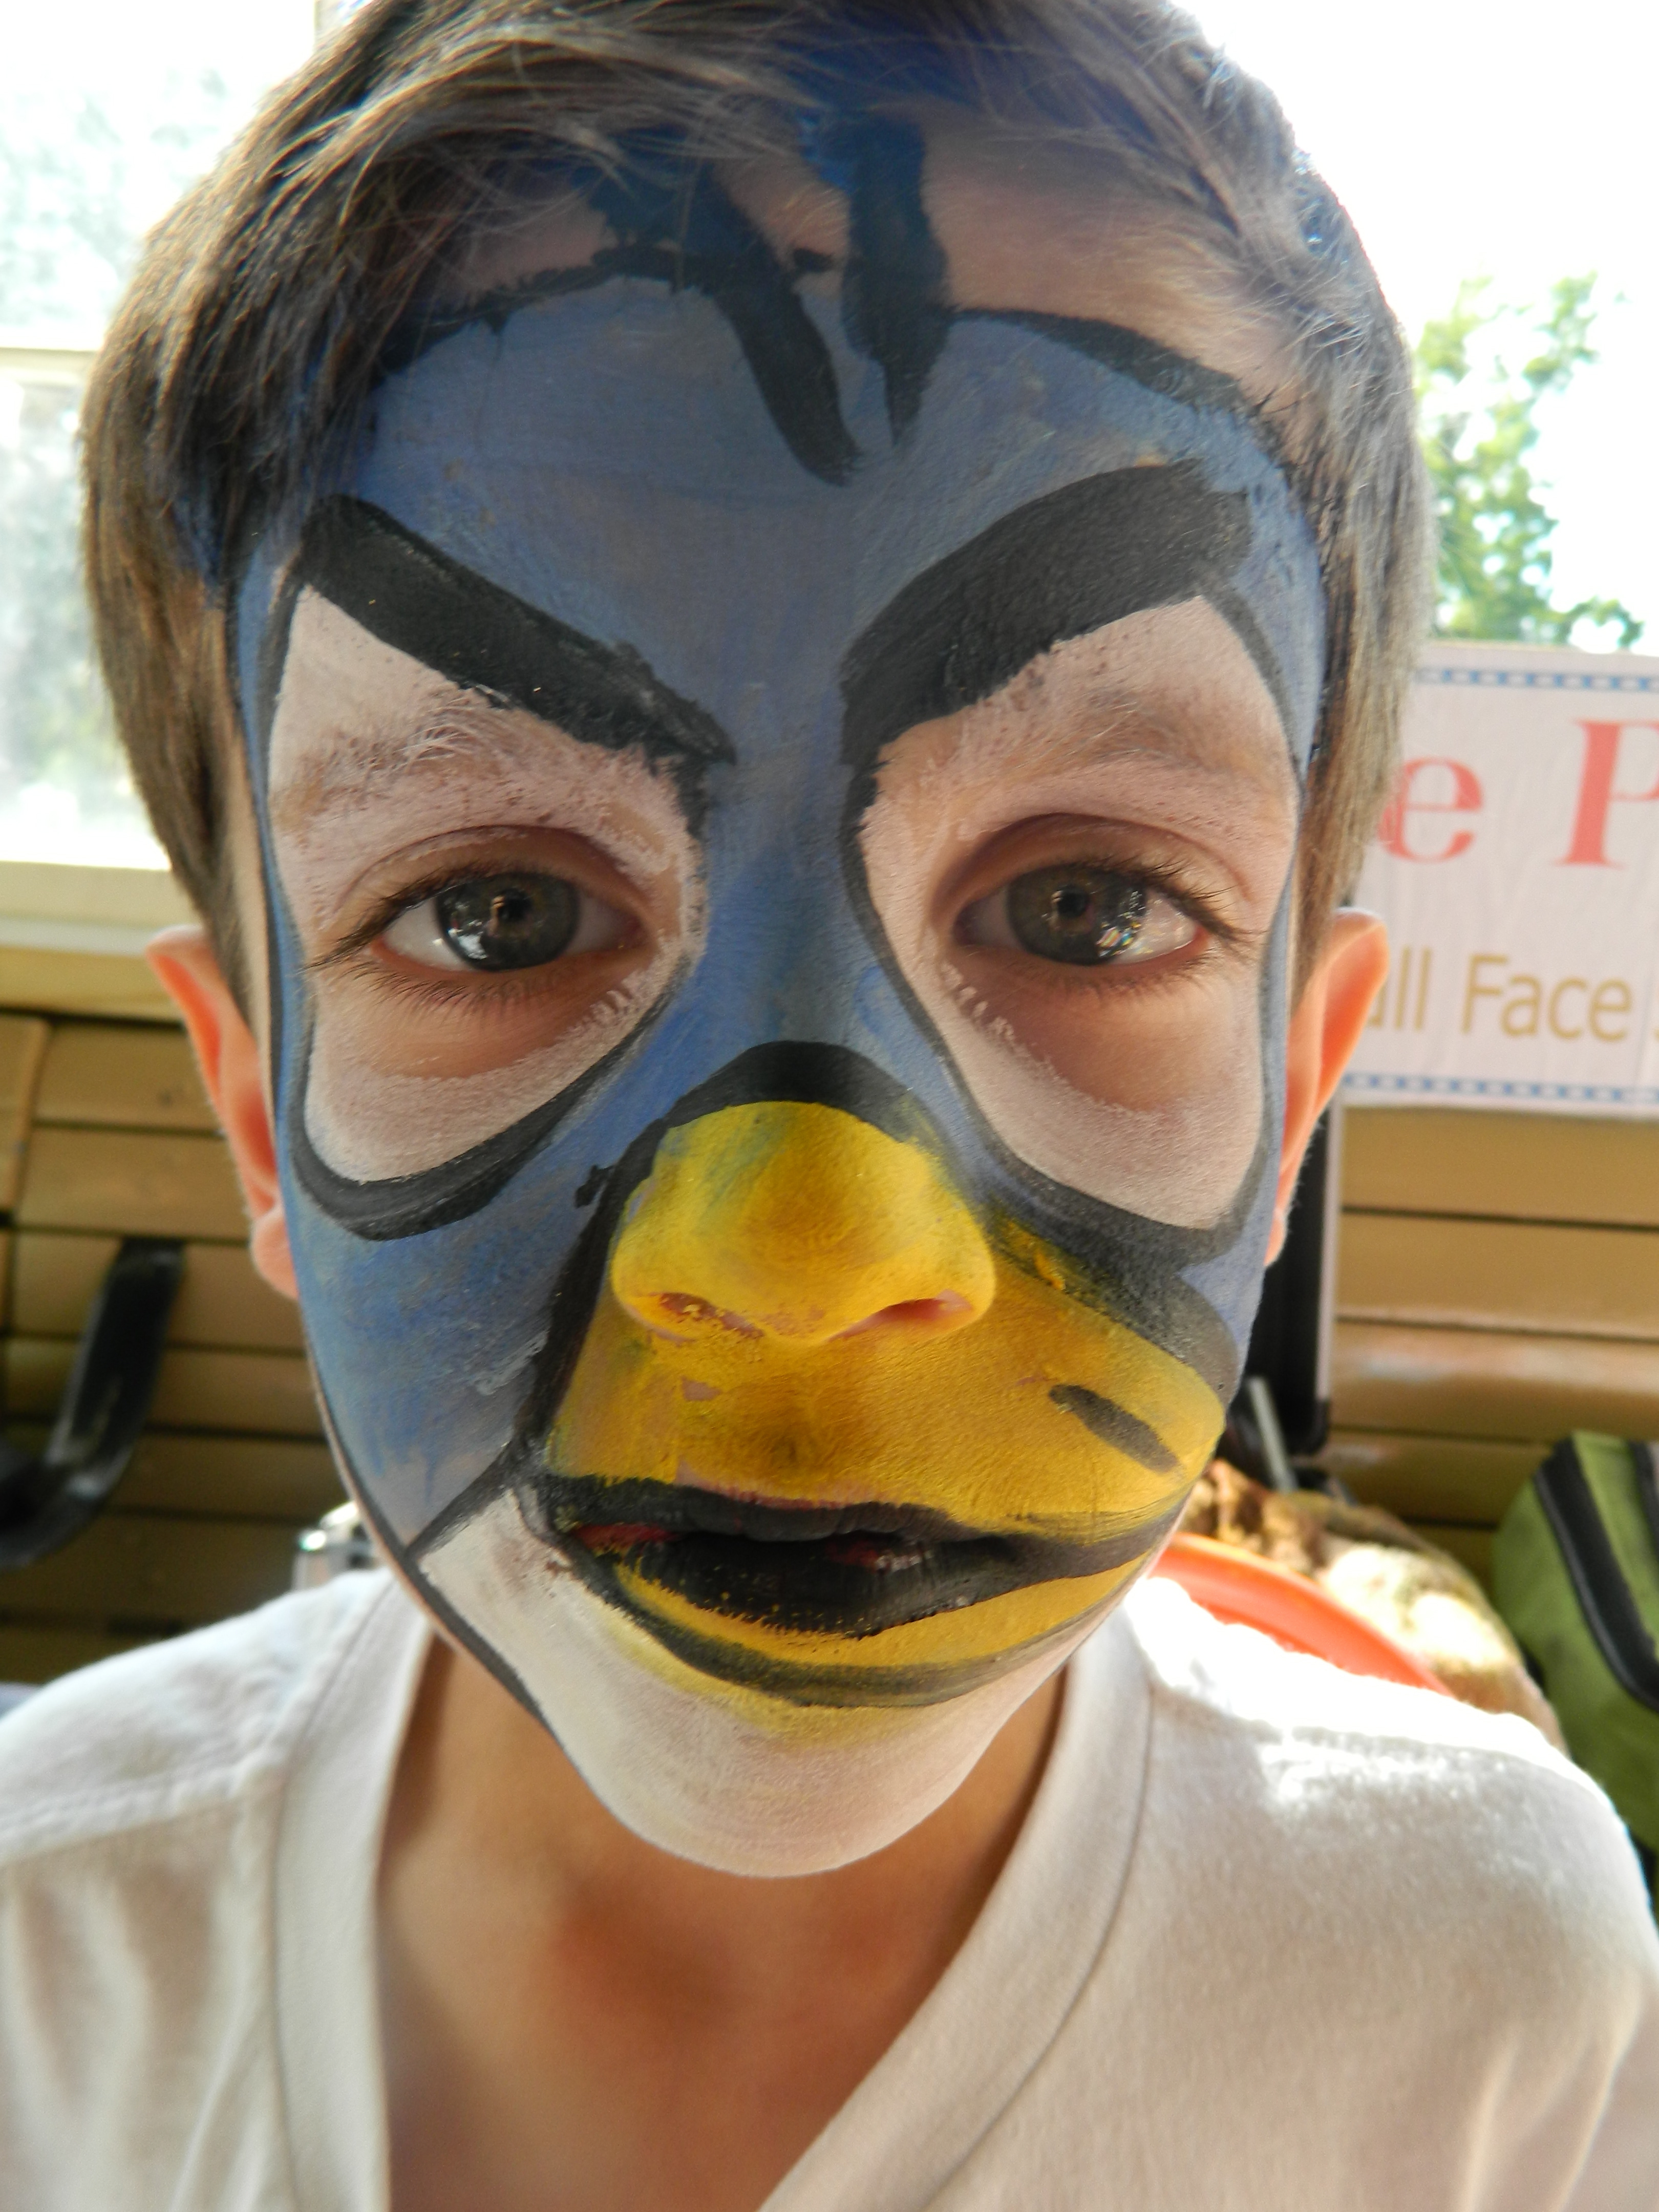
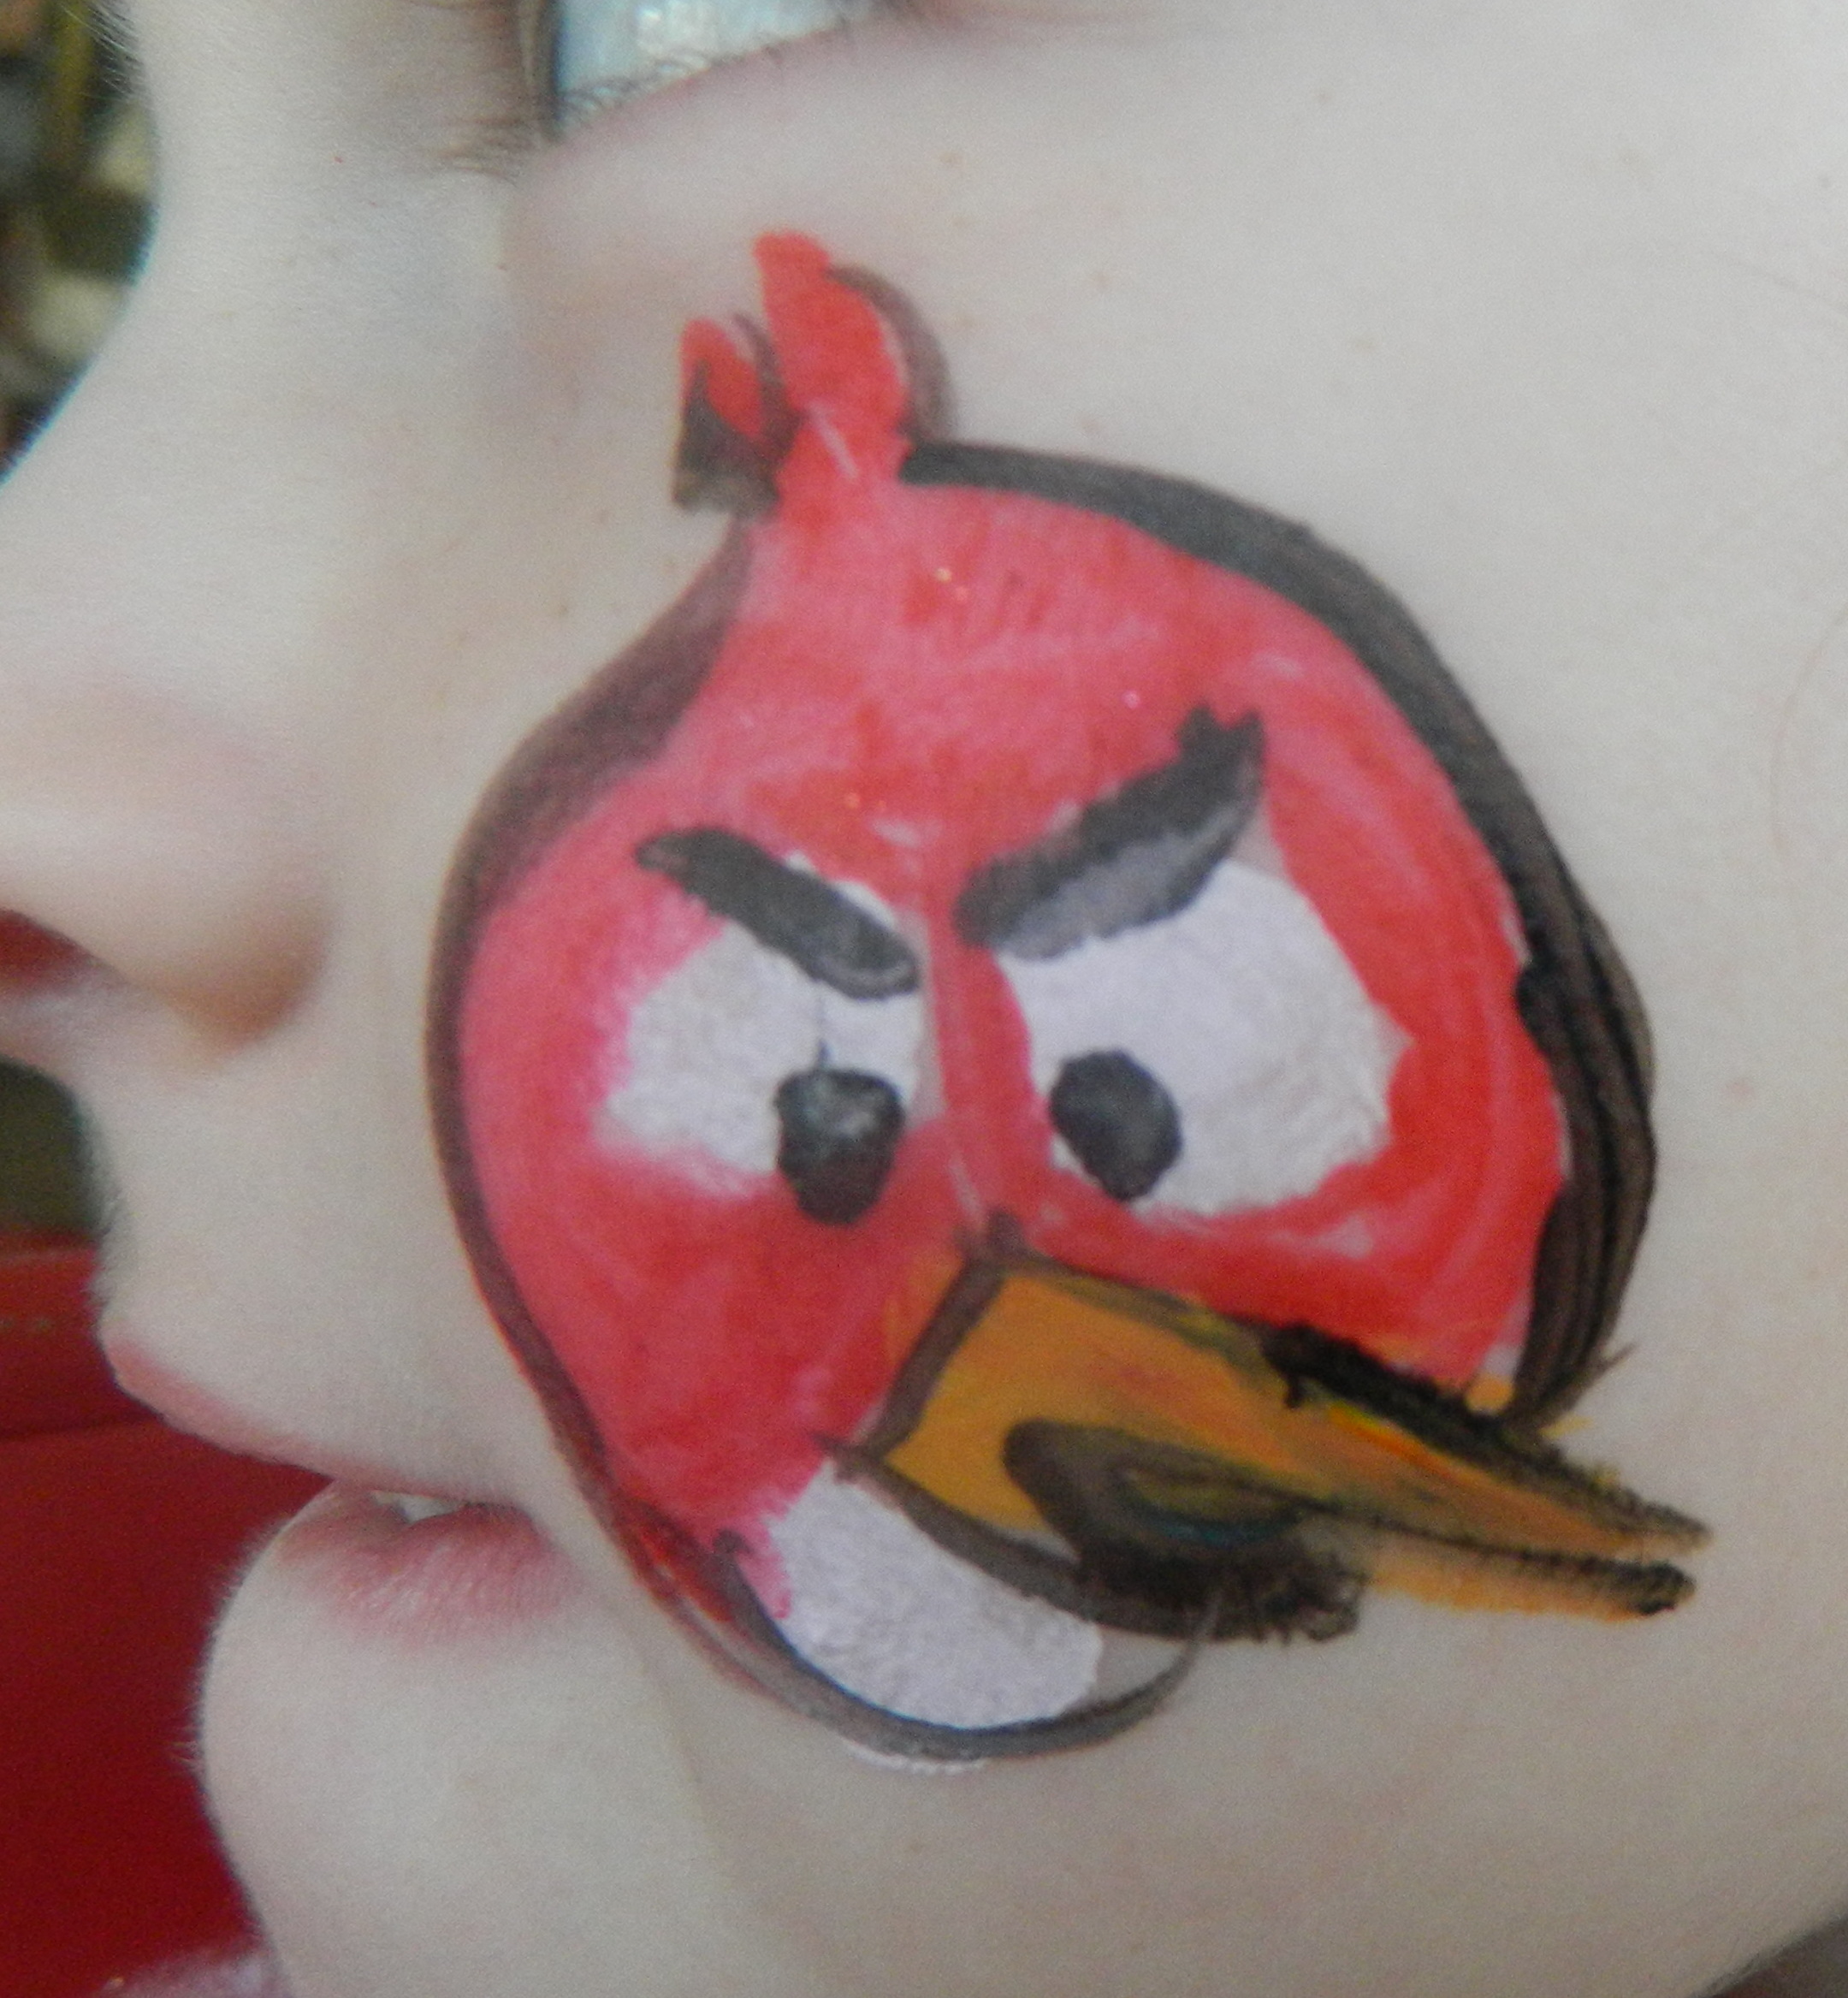
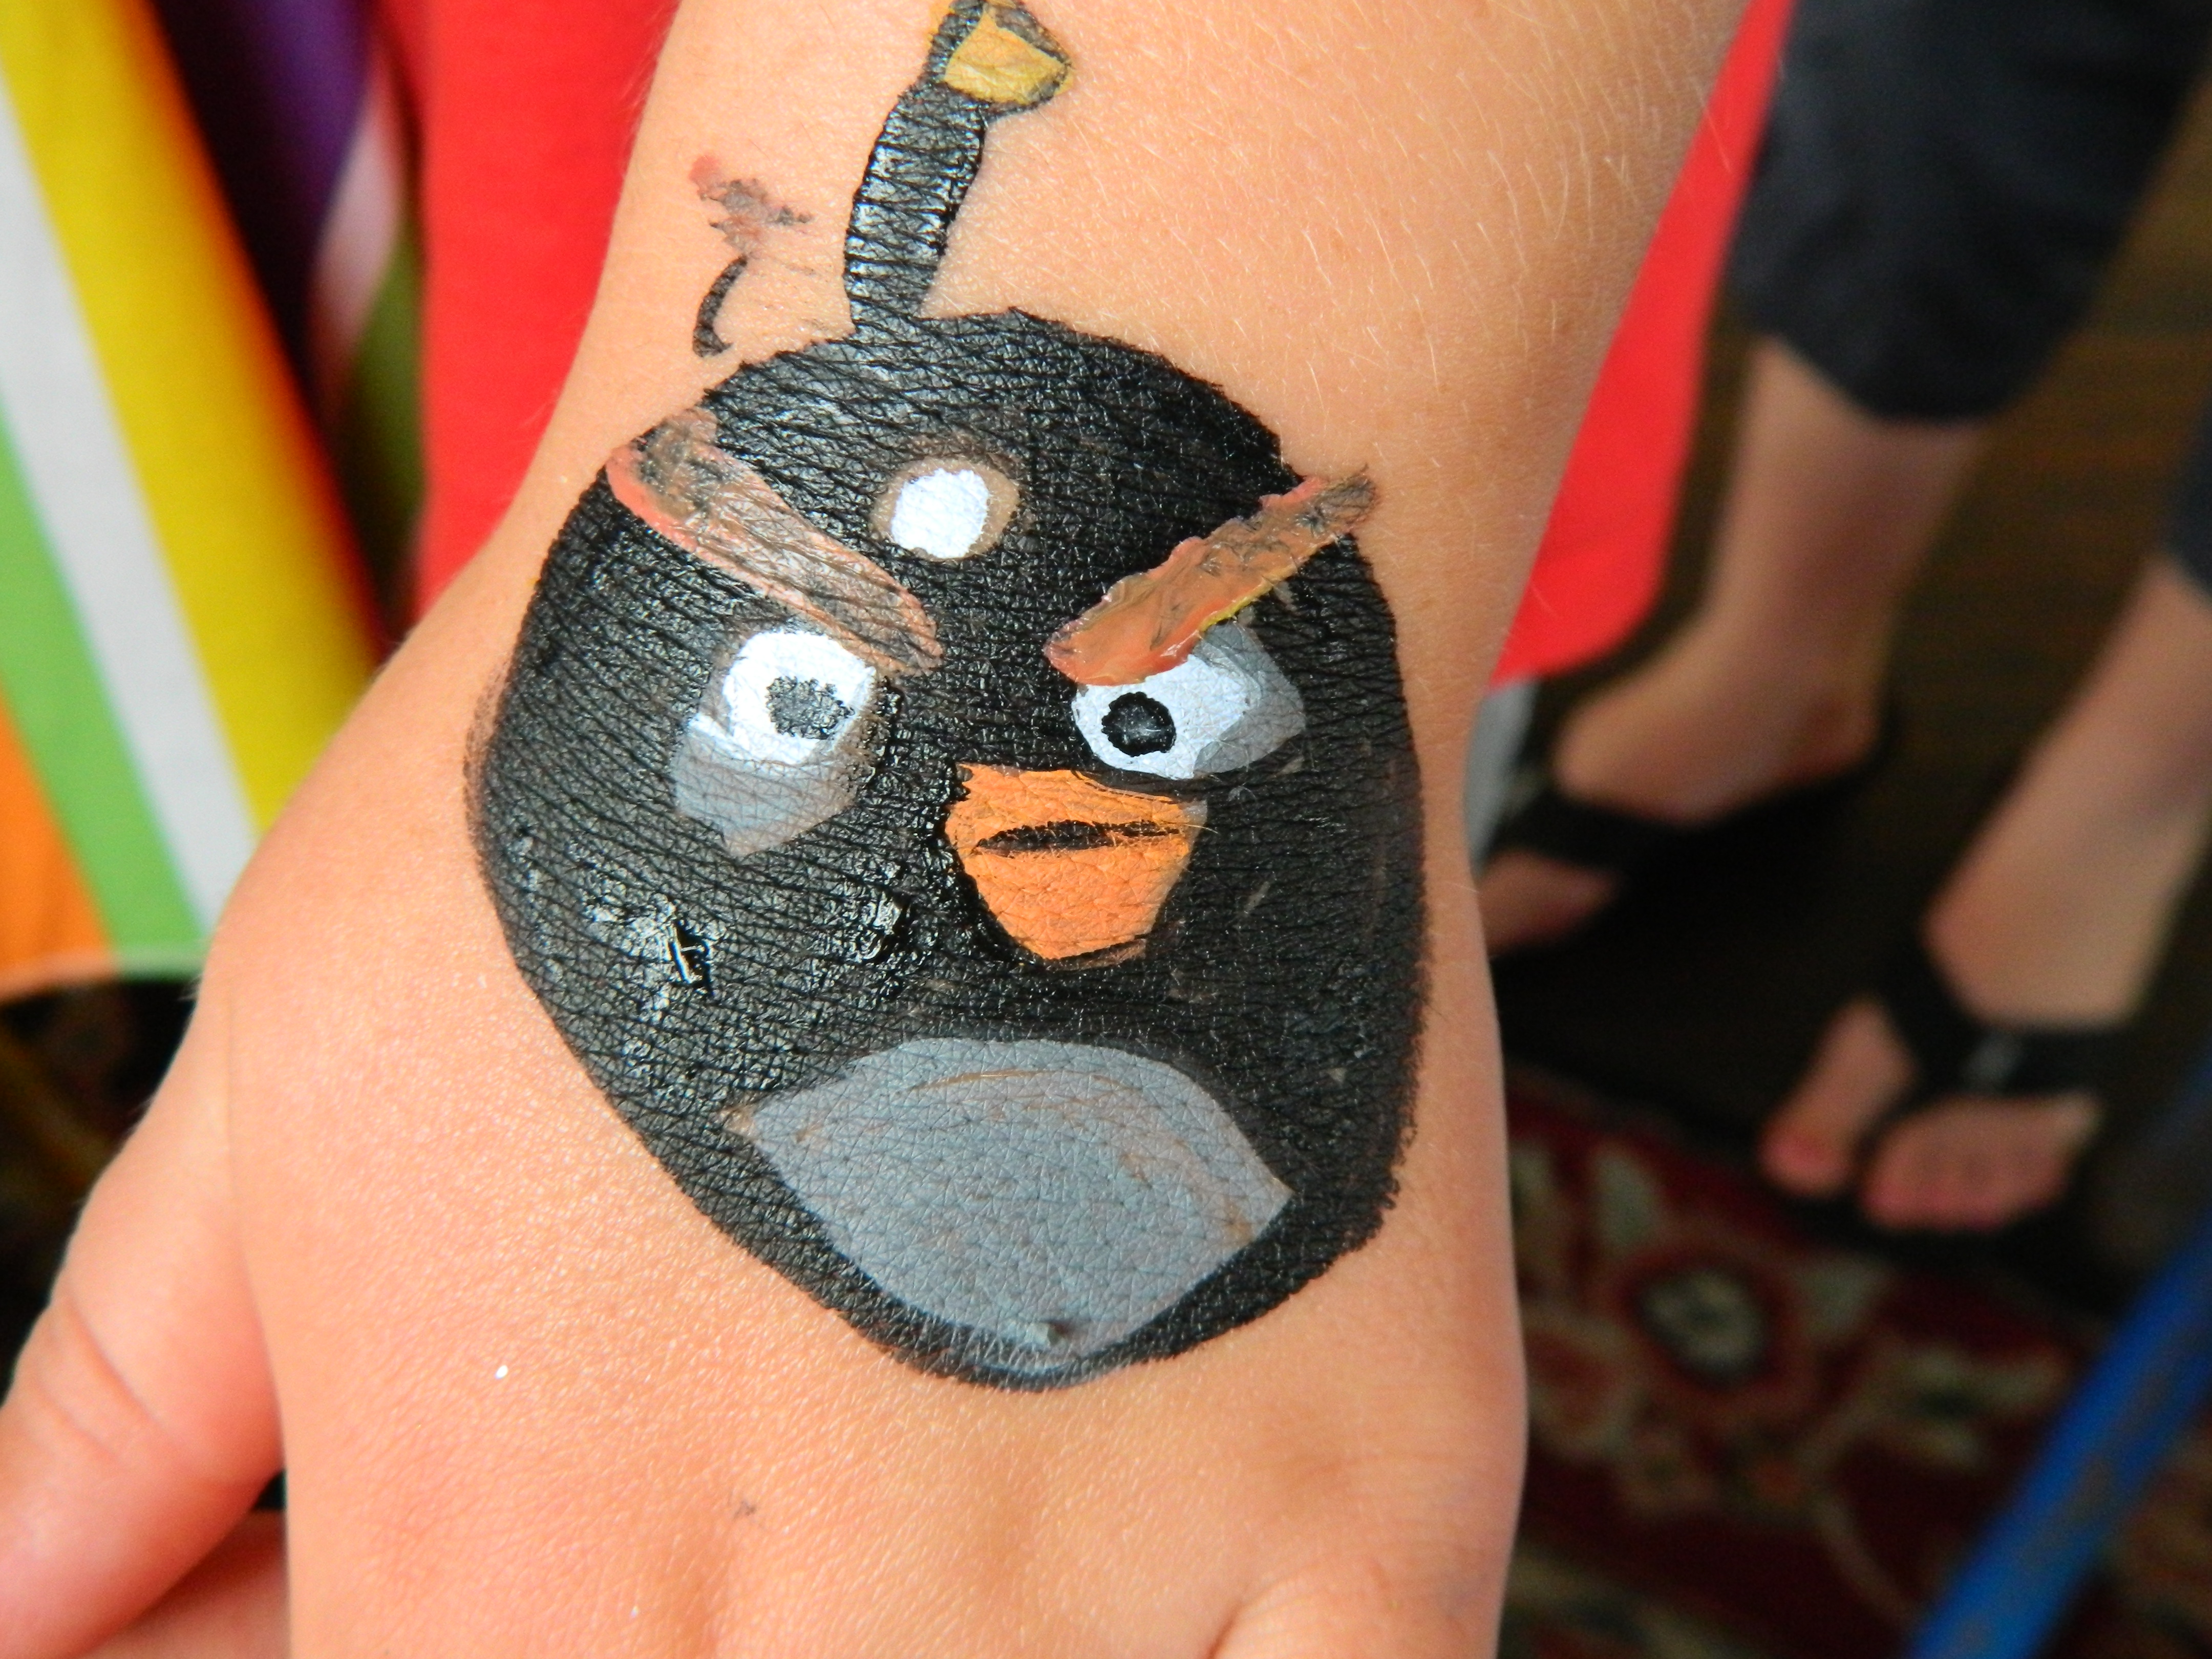
Angry Birds, as we all know, is a video game. Children and adults have asked me to help them become Angry Birds’ characters as cheek art or full faces. I thought that they were all red, but I learned yesterday, I was wrong. There are many Angry Birds characters that you may be asked to do. Here are the ones that I have found on the net. I want to show you how you can do these either as full faces or cheek art. I have been asked to do both. He rick is to do them as European Style face painting. No not overlap any of the colors. That will make your work look crisp and precise—something that all cartoon characters has in common.
We decided not to post the actual Angry Birds images, for fear that Revio might complain. Run “Angry Birds” on the net, and you will find many of these images. Some are harder to find than others. There was one image of what looks like a vulture, but I cannot find its name. Remember, I do not play the game. Here is a list of characters that I have found:
Red Bird Red Bird Girl Green Bird White Bird
Yellow Bird Big Brother Bird Blue Bird Black Bird
Mighty Eagle Blu and Jewel Orange Bird Bomb Bird
Small Pig Female Pig Mail Pig Mustachioed Pig
Large Pig Female White Bird King Bird Mighty Dragon
Helmet Pig
Run “Angry Birds” on the net, and you will find many of these images. Some are harder to find than others. There was one image of what looks like a vulture, but I cannot find is name. Remember, I do not play the game.
Each of these images has separate areas of color, and hen highlights of black. If you do the red of the Red Bird, and make a circle of red, then the black eyebrows and whites of the eyes will have red paint behind them. This might work with colors pads, but is quite difficult with liquid paint. So, the first area to be painted are the eyes. This will make the eyes as white as they can be, and you avoid messing up the colors later.
Put on the whites of the eyes. Keep in mind that most of the eyes have strong slanted eyebrows, so the shape is not a circle. The pigs do have round eyes, as do some of the birds, so make sure you know what the eye shape is before you start to paint. For the Pigs, you need to put down the light green for the snouts before you put on the base coat.
Now, what to do around the eyes? I have seen Face Painters recommend doing the colors around the eyes with a sponge, but I do not recommend it. If you use a brush to “mark off” the eyes, then there will be no chance that your sponge work will “hit” the whites of the eyes and then bleed into the face. I leave a space for the eyebrows, too, because I want the black. gray or brown of the eyebrows to stand out, and not have any other colors behind them. This lack of layering of color will serve you well in many design situations.
Colors that meet on these designs can be a real nightmare. Practice painting the areas of color next to each other without bleeding one color into another. Like most techniques that make good painters stand out, this is a skill that can only be learned by doing them and doing them again and again. Your arm should provide you with more than enough space to practice, practice, and practice. What you are working towards is a situation where the first color is laid down with the most fine or thin color at the edges while maintaining the intensity of the color that you need for your face. Then, the second color has to be loaded onto your brush with no hangovers, drips, or extra paint. Sometimes, when white is the first color, I will go back and do it second time after the second color is on—giving the white a chance to dry. Brian Wolf suggested that for teeth, do the black outlines first, and then when you put on the white—avoid having the white touch the black AT ALL. He pointed out that the gap will not be seen, and that will leave the teeth gleaming!
So, for these “Angry Birds” figures, you lay done each color first. You have to be able to picture where the beaks, the chins, and the base colors meet and keep them laid out like the countries on a map. Now, it is time to carefully add the black lines and details. Each Angry Bird has different colors for their feathers. Some have two colors on the feathers. The eyebrows need to be clear and hard edged.
The work with the Black lines can be challenging, because you want to be right at the edges of the colored areas. So, even though it might look easy, try not to put the black on quickly. Too often, the tip of the brush will “slide” into the color that you are going around.
The final touches for these characters are the small circles and highlight that the designers put onto them. There are highlights on the face of The Red Bird, White Bird, the Big Brother Bird and others need small touches to make then accurate.
The same techniques are used for full faces and cheek art. Just remember that the better defined your details are, the more the whole design will look like the original. Good luck, and don’t let Angry Birds make you angry!


Should You use Cakes or Liquids and Creams when Facepainting?
|
| REPRINTED FROM FACEPAINT.COM with permission |
by Marc Kohler
|
|
|
|
If you are a new face painter, it will make sense to ask what face paints to use. If you are an experienced face painter, you might be surprised that you can increase the quality of your work by considering using different or additional face paints, different brands, and even dropping some that you have been married to for decades. So, consider this more as an exploration. Whatever you decide to do, I want this writing to help you make those decisions. That I can give you the stepping stones across the creek on which you can step to find success.
Liquid vs. Cake Face Paint
I started with Liquids and Creams. I started with Mehron Liquid Makeup, and early on fell in love with Fardel. The Fardel Liquids worked like liquid magic – they flowed on with little or no resistance. Even with a bad brush, I could start a wide line, and take it down to a tiny thread. The Mehron Liquids can do equivalent work, but it may take some adjustment with water to get them to the right consistency. Mehron Fantasy FX Creams are very good paints, although I find they can change consistency from too much warmth or too much humidity. I had the opportunity to attend two 2-day workshops with Olivier Zegers. His command of the liquid and creams was awesome, inspirational, and the best. He would apply a circle of cream, line it with black, carefully shape the black softly up on the cream, and you could see a miracle appear as the jaw turned into a complex vision of depth. Then, with both a round #8 and #6 brush, birds, trees, clouds, and much more would appear in seconds as has hands moved around the face.
With these liquids and creams I was assured of a tacky surface to place glitter that stuck, shined, and glimmered! This seemed like a magic combination, and I used it for eight years. Then, cake makeup started to appear on the face painting scene. I saw painters using cups of color and making beautiful faces… faces that did not have wet paint or creamy creams. So, I started using soe cake facepaint. This was an important step fo rme, as Fardel had become extremely difficult to buy in the United States.
Using cake face paints was a shock for me as an experienced face painter – I found them difficult to use. When I used them, I would be carrying too much water, and drip. Other times, they were too dry and would not flow at all. Sometimes, I would blend the liquid paints with the cakes or visa versa. Then, in
April 2012 I was able to take a full day class with Brian Wolfe (side note: at this writing, face painters all over the world are praying for Brian’s health due to his recent diagnosis of pancreatic cancer, visit Brian Wolfe’s Fight For Life page to help out if you can). The hours there were as powerful as the hours with Olivier Zegers. Brian gave us all one cake of white face paint. I had brought my entire face paint kit of 50 brushes, thirty creams, and lots of bottles of liquids, but Brian assured us that everything we would do that day was going to be done with a single cake of paint, a lone number 4 brush, and his life time of experience.
 So, we stared with lines on practice head. Lines and lines and lines. At one point, Brian suggested that we paint lines up and down the side of the model head. I laughed and said that that was impossible. I would never have tried that my with liquids. So, Brian came up, took my practice head, and proceeded to curly cue, line, and decorate one side of the head and all the way down to the other. The cake had given his brush exactly enough color and water to keep flowing without dripping, stay consistent in color and just keep going! From then on, over the next four hours, this little #4 brush did more work than my hands have ever seen. The liquids have never been able to do this—my lines around my princesses’ eyes were never this graceful, this detailed, this luxurious. Again, at 64, I was too old to have to learn these kind of basics all over again, but I have tried.
Differences
There differences between liquid, cream, and cake makeup, are mainly to do with the differences in moisture. With cakes, you have one color. When I try to mix colors outside of their cups, the colors seem to dry too fast, or stay too wet. I do mix them in their cups, but then that messes up the color for future use. I often times will clean out a cup with a paper towel or nap. Then all is well. With creams and liquids, color mixing is easier and can be done on a palette while staying moist, giving vast variety to the amount of colors you have to use. With all types
I take my creams and put them into 2 inch diameter art cups, available at most art stores with screw tops or snap tops. I use or make blend Mehron Fantasy FX or Fardel creams in the following colors: Red, Pink, Light Yellow, Yellow, Light Orange, Orange, Dark Orange, Lion Yellow, Light Green, Yellow Green, Green, Monster Green, Camouflage Green, Light Blue, Blue, Turquoise, Lavender, Purple, Light Indigo, Indigo, White, Yellow White, Black, Beige, Tan, Brown, Dark Brown, Dark Grey, Light Grey, Gold, Silver, Copper. I also mix liquids re-using the Mehron bottles. I make all the colors that I make for the creams in addition to more shades of orange, browns and tans, and some colors that I make up to compliment the primaries, secondaries, and tertiaries. Why? It allows me to do animals with a light lined mesh that mimics fur. My Mardi Gras princesses pick up touches a indigo which is truly an exciting color.
In summary
If you are beginning, start with cakes, and see where and how far they can take you. The only real weakness of these cakes is that they dry before you can get the glitter on. To compensate for this you can roll you’re a #8 or larger round, slightly moistened, glitter dipped brush over the section where you want the glitter to stick. Ben Nye Glitter Glue and Ben Nye LiquiSet are great products, and Sally Beauty supply makes a clear glitter glue that works very well. In time, you can start using creams by adding black and white Mehron Fantasy FX, and then let your imagination and energy be your guide. You can send any questions about this post to my email, and I will answer any that I get.
|
|
Creating and Using Split Cakes
|
| PEPRINTED FROM FACEPAINT.COM with permission |
Creating and Using Split Cakes by Marc Kohler
|
|
|
|
Face Painting was once dominated by the use of liquids and creams. Olivier Zegers taught me to use them, and over the past ten years I have used Fardel and later Mehron Fantasy FX cream and Liquids. Recently, I have started to rely on cake face paints more and more after attending a workshop with Brian Wolfe in April of 2012 and watching various face painting videos on YouTube. So, what follows are not all my ideas… some of them are, but I started by watching and learning from others!Since I have started to working almost exclusively with cakes, I keep the liquids and creams for specific situations. So, if you are a new painter or an experienced painter, I want to share with you my discoveries of cake face paints, and split cakes in particular.Sponging on multiple colors from a cake made up of several colors is shown over and over again on YouTube. You will see Rainbow Cakes, cakes with various “theme” split cakes in many color combinations, ideal for quick base coats for many designs. Use a split cake to paint a basic shape, then add detail with white and black lines and swirls. I find that the multiple color cakes can come perfect in size for immediate application, but some of them are too large to use on a cheek or just over the eye, so I started making my own multi-colored face paint cakes.
 The first one I made was a Rainbow cake which would fit better on children’s cheeks and above and next to their eyes. You see, here is a Mehron Paradise Prisma Arc-En-Ceil Rainbow Cake. As you can see, the cake is about 2 inches wide. This was too wide for any of my brushes, so I started using a large fan brush to lick up the paint. I would then squeeze the bristles to a width to fit on a child’s cheek or along the side of the face or across the forehead to provide a base for unicorns, butterflies, and stars. This was awkward, and did not make a good clear rainbow. So, I decided to halve the rainbow. The first one I made was a Rainbow cake which would fit better on children’s cheeks and above and next to their eyes. You see, here is a Mehron Paradise Prisma Arc-En-Ceil Rainbow Cake. As you can see, the cake is about 2 inches wide. This was too wide for any of my brushes, so I started using a large fan brush to lick up the paint. I would then squeeze the bristles to a width to fit on a child’s cheek or along the side of the face or across the forehead to provide a base for unicorns, butterflies, and stars. This was awkward, and did not make a good clear rainbow. So, I decided to halve the rainbow.
To modify the Prisma Cake, I first froze it overnight to make it firmer and easier to cut. This is because the cake had previously been used, and the water from earler use had made the paint soft. It is much easier to work with brand new cakes, and freezing isn’t usually necessary. Using a very sharp Stanley Quick Point blade (the kind with the snap-off blades), I cut the paint in half, compressed it and packed it back in the container. I also used a popsicle stick as a divider between the reds to create 2 distinct half-sized rainbow cakes exactly as wide as a child’s cheek and a  perfect fit for aOne Inch Flat Brush. You might have to “clean” the cake with a dry paper towel after handling it. perfect fit for aOne Inch Flat Brush. You might have to “clean” the cake with a dry paper towel after handling it.
This same basic technique works for creating your own split cakes, which you can do with any 2 or more colors. After making this rainbow cake, I moved on to making additional 2-color split cakes – white with a color. They create a color bordered by white, helping to create fantastic face paint flowers. In fact, stay posted, and I will be discussing Flowers in my next article.
To use a split cake, lightly spray the cake and the face painting sponge with water – not too much, practice will help you determine the amount. Then, stroke the cake back and forth in a straight line several times to make sure that the colors will be bright. Then paint on the skin in smooth strokes, later adding detail with a brush.
One note on using split cakes is that the various colors do not always wear evenly. This is because the pigments in the cakes have different densities. So, the blue in my white and blue cake dissolves much faster than the white. I try to keep back-up cake face paint to fill in when a color starts getting low.
So, let’s look at other cakes that you can make to help you face paint with wonder and magic. This takes me to an area that I really love—making flags!! Today, we have children with ethnic connections to every country in the world. If the see the flags we can make, they will pick them and enjoy them, and find pride in the ethnic identities.
| The American Flag |
 |
There are 13 stripes of white and red. The box is 1 5/8” wide. So, for 13 stripes, I had to cut each stripe exactly 1/8”. This became too difficult and I eventually decided to make seven stripes, making sure to have two reds on the outside. Again, chilling the cakes makes it is easier to cut them. When you put the stripes, use only five of the stripes in the cake. |
 |
When you put the stripes, use only five of the stripes in the cake. Start the first line of flag stripes “indented” to leave room for the blue field. |
 |
Then, on your second stroke, overlap the red stripes, so you end up with 9 stripes. |
 |
Then, after the stripes, you paint the corner blue, and add the stars with white, yellow, or bright gold. In the photos, you can see that I added glitter to the blue field. |
|
| I looked for other flags which I make color palettes, and I found quite a few. Some of them are just stripes, and some of them have stripes with a medallion or symbol painted within one of the stripes. I got the largest list at theodora.com/flags. If you need more detail, you can use Wikipedia. You can do lots of different flags using split cakes. |
Well, that’s all for now, and I hope to back with examples of all of these flags. Also, I am working on a blog about making Flowers. Email me is you have questions, marcwkohler@aol.com or use facepaint.com.
|
|
Organizing Your Face Paint Palette
|
|
Organizing Your Face Paint Palette by Marc Kohler
|
|
|
|
The term “Palette” in the practice of art or face painting has two meanings. The first is the actual piece of wood, plastic, ceramic, paper, press board, or other support which holds the paints to be used in the painting. The second meaning has to do with the colors selected for the palette. That is why art critics discuss Rueben’s palette or Van Gogh’s palette as an attempt to select and study the colors used by these painters, discerning whatever limitations or opportunities that the particular selection gave the artist. In Face Painting, the term is used with both definitions.
Let’s look at the first meaning of palette for the Face Painter. Buying a set of paints in a palette gives you a physical space to hold your face paint cups. These can be moved from one space to another, and will give you a chance to put your colors in the most comfortable arrangement possible. I place mine in order of importance, so the least used colors are further away from the most used. With a smaller palette you will not get any “in-between” colors, just the major rainbow shades. If you can afford one, a larger 14 to 30 color palettes will give you the most variety. In these larger palettes, similar colors such as red and red-orange or red and yellow will not be next to each other, so, I rearrange it so the colors I use the most are closest to me: white, pink, light blue, yellow, and orange. The black, dark blue, dark brown and purple are grouped further away with dark colors surrounding the black. Most kits put the black and white right next to each other, but if you use liquid paints like I do, this can lead to cross-contamination when you are rushed.

Marc’s palette
(Colors are stored with lids on, shown here without for visibility.) |
My own palette is a homemade wood palette that holds lots of colors, and gives three shades each of Orange, Brown, Green and other colors that require highlights.Mehron Liquid Makeup 1st Row: White, Red, Yellow, Light Blue, Purple; 2nd Row: Black, Pink, Orange, Light Orange, Green, Light Yellow; On the side: Grey, Light Grey, Very Light Orange, Lavender, Monster Green, White, Indigo (often overlooked color)Mehron Fantasy FX Creams 1st Row: White, Red, Yellow, Beige; 2nd Row: Orange, Pink, Blue, Tan; 3rd Row: Green, Light Orange, Light Blue; 4th Row: Black, Brown, Light Green, Grey; 5th Row: Lavender, Dark Brown, Purple, Silver; One the Side: Monster Green, Copper, White Yellow, and Moonlight White
Sally Girl Sparkle Effect Loose Glitter in various shades including white, gold and silver. Available online from Sally Beauty Supply. Refill the containers with your own glitter if desired. |
Build this palette
The palette is approximately 17”X13” which fits perfectly into the silver briefcase tool boxes available at Home Depot and other stores. You can fit two of these palettes in one case and have a potential for over fifty colors.Build with wood that is at least 1/2″ thick, 3/4″ is more stable but heavier
The holes are drilled completely through and an extra piece of 3/8″ wood is attached to the back (you can also use a router to cut though partially instead).If desired, paint the palette with gloss or semi-gloss paint to make cleaning it easier.Arrange No-Spill paint cups in the holes and fill with desired colors of liquid cream, or even cake face paints (just stack several of the refill sizes in the paint cup). I use Utrecht Richardson Spill Proof Paint Cups, but check your local craft store.
I do not glue the cups down, as I like to rearrange them, but you can – or use museum wax to hold them in place if you’re concerned about colors falling out of place. |
Palette Pattern

Click to open in a new window for printing.
|
Now, what colors to put in your own face paint palette? The most limited palette would be the primary colors red, blue, and yellow along with black and white. This gives you limited resources, but a conveniently small set of paints, and that can help keep thing simple. If you add the secondary and tertiary colors to these you get what is the normal color wheel. The extent of the possible colors becomes even larger still if you add the variations of Black to Grey, Brown to Tan, and/or the Metallics (Silver, Copper, Brass and Gold).

Why so many colors, and how large a palette do you want or need? Here is where the paint meets the brush, and the face meets expectations. I think that it was the Wolfe Brothers books that introduced me to stippling, and many designs in Face Painting magazine introduced me to the “dots” attack. Through these techniques, I learned that one color can made “alive” with complementary or competing colors. “POP” is the word we use to describe that lucky design or added touch that makes the wearer and their family discover that you are not just a face painter, but you are a FACE PAINTER!!! For example, using four shades of orange make my tiger fur look like you could pet it, and multiple greys and browns make my cats and dogs look alive to the children and the face paint design takes on a wonderful Mask effect; the child will crawl, growl, and howl as they look at themselves in the mirror. The ability to add depth and excitement to your face paint designs is why you need BOTH a good physical Palette and a crazy and exuberant selection of colors.
|
|
Face Painting Touch Sensitive Children
|
|
by Marc Kohler
|
|
|
|
Jumpy, nervous and/or scared children require Face Painters to be on alert and aware of their needs. All of us will bring to this task whatever training, intuitions, and assumptions that we have, but there are tested and tried techniques that can help you do your job. I have played Santa Claus for sixteen years, and I have seen extremely scared children. I have also rolled around on the floor, giggled, danced, and sang in order to inform the child that this Santa is no coal-giving vengeful punisher. For this Santa, the are NO naughty children, just stressed and alienated children who need to know that that elf on the shelf does not see or know or even tell anything to me. Sounds different, well, I hope it is, and I hope it will catch on.
So, let’s look at the problem of younger scared and/or nervous children from the easiest to deal with to the most difficult. Yong children are afraid of painting on their faces. So, lower your voice to speak quietly, and offer to paint the backs of their hands, maybe even offer to let them feel the brush on their skin with no paint on it, or paint a quick design (a heart or smiley) on Mom or Aunt’s or Uncle’s hand. These efforts help the child to know that the painting will not hurt! If the child is willing, try something small on the cheek of the caregiver. Often, this will lead to the child allowing cheek art to be painted, but do not be pushy if they’re not comfortable.

Sometimes, I am able to do two or three small designs on the cheeks and forehead. For a full face like a cat or lion, I will try to do a little base coat, or skip it entirely and do a quick detail-only face. “Detail only” means “paint only the details needed to suggest the larger design or motif”. The most famous example of this kind of work is Picasso’s 14-line portrait of Shakespeare – the idea is to paint just the essentials of the design, yielding a recognizable design.
Above all, work with parents of shy children – guide the parents away from pushing the child to do something they’re not comfortable. As mentioned above, suggest that the child watch the painting process on someone else, or have them sit in a caregivers lap while being painted. If needed, tell the parent, “Maybe today isn’t the right time for him/her to try this” – it’s important for the child to be comfortable. Some painters will offer stickers to shy kids instead, a great, less intrusive option.Now, what to do with older children—five years old or more? They WANT their faces painted, but they may be afraid of the process. The touch of the brush can cause them to squeeze their eyes closed, or they might slowly move backwards as you paint them so your brush will move away from the skin. They might clench their teeth, start to shake, or other nervous action. They also might lean their heads down towards their chests. Again, stop and meet the problem head on. I will gently put my left hand under the chin of the chin dropper and say something supportive, like “Let’s see what else I will do.” The child needs to be reassured directly that whatever they feel that causes them to avoid the painting, will be taken care of. In this case, I mean we have to be prepared to do anything—here is where letting the child (or caregiver) hold the mirror so they can watch the process can really help and talk through what you’re doing as you paint. Slowly relieving their fears will be very good for them, and it will be a time for them to grow a bit.Stop painting if the child is stressed. Talk with the child about what they are feeling, and point out to them that you will do whatever is necessary to relax them. If this works, then you can resume painting, and continue to talk through what you’re doing. If the child just isn’t comfortable, try painting a hand or arm piece, and give up the painting if all else fails.
There are children, though, for whom this does not work. Unlike the fearful children discussed above, these children are reacting without any conscious knowledge that they are jumping away from the brush. They are Tactilely Defensive. These are the children who literally jump when the paint brush touches their faces.
“Children that have tactile defensiveness are sensitive to touch sensations and can be easily overwhelmed by, and fearful of, ordinary daily experiences and activities. Sensory defensiveness can prevent a child from play and interactions critical to learning and social interactions….”
(from the Sensory Processing Disorder website: http://www.sensory-processing-disorder.com/tactile-defensiveness.html)
This child wants to be painted, and will willingly sit on the chair, and be prepared to be painted. When the brush or sponge touches their skin, they will jump or jerk without control that a child who is just scared has. I worked as a resident artist as a puppeteer for adults and children for fifteen years at sites in the Providence, R.I. area. (Meeting Street School, CITE, Branch Vocational School, Grodin Center, Cranston Center, Very Special Arts RI. and others). In these setting, I had to translate the requirements of puppet making for each and every individual that I worked with. A blind/deaf child could use a “moving mouth puppet”, and actually communicate with it. A child made a “Dennis Eckersley” puppet, and the puppet’s problem was that he could not pitch in a game, so Tommy had to replace him. Tommy was strapped to an erect holding device due to his cerebral palsy. You see, children with cerebral palsy do not have any mental difficulties, so they can write.
The best way to handle this child, then, is to find the “way” to calm the spasm—find a way to place the paint on with the least tactile assertion. Again, you have to remember that the child wants to succeed, and our job is to create that success. Have the child and guardian work with you. Paint can go on with your backup supply of Q-tips. The design can be simplified and made broad enough, so the face is painted, the child wins, and so do you. Have the child “help” you paint their own face. Share holding the brush or sponge. Let them become emerged in the process, so their natural aversion will be challenged by a sense of control. This will create a kind of joy that is contagious—slip-ups, goof-ups and anything else that happens is PART of the design. When the face is done, allow the mirror to do the rest! Have faith that you as a face painter can help a child who desperately wants to overcome their defensiveness and find success. That is exactly what I look for when a child is no longer afraid of Santa—you will be creating a little miracle in a world that lacks enough miracles at this point.
|
|
Face Painting Sponge Techniques
|
|
by Marc Kohler
|
|
|
|
When I first started face painting years ago, I read every face painting book and magazine that I could find. Some of the international magazines reported on contests that were held at the festivals. There were contests with different requirements, and one that really interested me was the one where painters were required to use only sponges. That contest drew my attention because, as a new painter, I was having real problems with sponges. When I saw the winning designs, I was stunned. Here were intricate designs and textures that would be impossible for the sponges that I was using.It turned out that the winning painters did not use plain sponges. They arrived at the competition with sponges cut and shaped to make the intricate forms that appeared in their designs. Sponges? These were not sponges, they were sophisticated “stamps” and images cut from sponge material. Each “sponge” piece would be useless in any “normal” face painting.So, let’s talk about sponges that you can use when face painting, what the sponges can really do, and how best to use this information in your work. Some different types of face painting sponges are:
1. High Density Sponges
2. Hydra Sponges
3. Stipple Sponges
4. Natural Sponges
5. Sponge Stamps
6. Home-made Sponges
In today’s article, I am going to discuss the use of the standard High Density Face Painting Sponge and what I learned at a class that I took with Brian Wolfe.
 There are several manufacturers who make and market the “high density sponge.” They are usually round, and can vary in diameter and thickness. Some are quite soft, others are stiffer. Each one will work differently in your hands. Face painters often cut them into two shapes–in half or in quarters. The half round is definitely the more popular, but the quarter sponge has some very good applications. The major use of sponges in Face Painting is to cover large areas of the face with a flat and full area of color. The goal is to create this coverage quickly and thoroughly. There are several manufacturers who make and market the “high density sponge.” They are usually round, and can vary in diameter and thickness. Some are quite soft, others are stiffer. Each one will work differently in your hands. Face painters often cut them into two shapes–in half or in quarters. The half round is definitely the more popular, but the quarter sponge has some very good applications. The major use of sponges in Face Painting is to cover large areas of the face with a flat and full area of color. The goal is to create this coverage quickly and thoroughly.
So, start with a wet sponge and rub it over the face paint cup or into the cream (whichever you’re using). The amount of paint that you pick up will determine how easy the paint will go onto the skin, and how much you will be able to cover. Use too much paint and the paint will build up on the skin at the edges. You can see and feel when the cream face paint goes on too thick.
The one color base coat: If I am using creams, I will put a pop of paint on the nose, the forehead and the cheeks, I then spread the paint, and I work it, spreading the paint so that it is applied smoothly, evenly, and is opaque. This can be difficult, for your eye and hand coordination has to “see” slight changes in thickness, opacity, and texture of the paint. The goal is to create a cover which is exactly the same color and tone at every point. This is what distinguishes a practiced painter. If the base coat is uneven, splotchy, or too thick in some places, the detail of the design will be affected.
In the example from Brian’s class, we laid down a two color base coat of orange highlighted with yellow. Brian emphasized the fact that the highlights should be added to the high points of the face, taking the facial contours into consideration. The second photo shows the addition of a darker red orange a yellow tan base coat with white highlights on the chin and over the eyes. The third photo shows the same process of a sponge of two colors, not over each other, “lion” yellow and white.
 Orange/Yellow Base Orange/Yellow Base |
 Red Highlights Red Highlights |
 Lion – Unblended Yellow/White Lion – Unblended Yellow/White |
Once you have mastered this “all-over” base coat technique, you use the same technique to do sections of the face. If you look at European Face painting as compared to American face painting, you will find that the Europeans like to put down separate color areas, rather than build up from an all-over base. The disadvantage of this is that it takes more time and more accuracy, but the colors will be brighter because they are not being put on top of other colors. You have to make a sponge “hard-edge” to make sure that there is no blending of paints at the edges. The sponge “hard edge” is made by placing the edge of the sponge exactly where you want the paint to stop, pushing and sliding in a slow and deliberate fashion. The process, repeated will give you a hard edge as if you did it with a brush. As you work with the sponge, though, if this “edge” is difficult to accomplish, you can combine a brush line with a sponge to accomplish the same thing.
The following photos show a Spiderman in process. Do the eyes first—with a sponge if you can and with a brush if you can’t. I used a brush, but this is one application where the quarter sponge can do wonders. Then to avoid the red sponge work from blending with the whites of the eyes, brush on a safety band around the eyes. This way, when you apply the sponge base, it will go on quickly without any concern for crossing into the white and creating the dreaded pink.
 White Eyes White Eyes |
 Red Outline Red Outline |
 Red Base Red Base |
This is the way you work with the standard sponge, and now a surprise. If you get to look at any of the Wolfe books, you will see a stippling effect on almost every one of them. This stippling is usually accomplished by using a hard natural sponge, a stippling sponge, a splayed brush (which is something Brian suggested) OR, you lf can take your standard have sponge, and force it into a half donut with the flat side facing out by squeezing it around one of your fingers. This stretches the sponge, and widens the pores on that side. Here is what this technique can do:
 Stippled detailing Stippled detailing |
 |
|
|
How to Face Paint a Lion
|
|
by Marc Kohler
|
|
|
|
This is discussion of some ways to develop your own designs for face painting, with the example of a lion. Face Painters tend to look toward other face painters’ work for inspiration. I have done it throughout my work – if I can see it, I can paint it (well, sort of). So I continue to seek out new designs, and try to find new techniques through alternative sources. I have to give credit to my Stage Make-up teacher, Jeffrey Butterworth, for these ideas.
Research the animal you’re designing
When designing your own lion, the first step is to find images through an internet search of “images” for lions. I like looking at photos for designing full face paint designs, I peruse “Clip Art” or “Black and White” images for designing cheek art. Assume that you know nothing about lions and examine these images as if “lion” means nothing to you. You will see details and aspects of the lions that you have never seen before. If you wish, save the image by right clicking on it (or ctrl + click on a Mac).
I also look at biological descriptions to broaden my image search. Here is the title for the family and species for lions:
If you go to the description of Pantheriae, you will find all of the lion’s “brothers and sisters” and you’ll find the skulls of the members very similar. So, the difficulty with face painting lions is that because they have no spots, stripes, “cheetah” lines, or other obvious distinguising features, a lion face paint design can wind up looking like a brown/tan cat.
What distinguishes the lion from other cats?
We need to find what distinguishes the Lion from these others, so we will be able delineate lions from the others, as well as Lions from Cats. If you study photos of Lions, Tigers, Cougars and Leopards, you will see four distinctions. Lion noses are wider, and the fur above it forms a triangle of differently colored fur than the fur around the eyes. Secondly, the eyes do not have those sharp “feline” eyes, but rather, they are “sad” eyes with the outer lid going down at the edges. The third distinction is the white fur on the chin, and a small “mustache”. Notice how small the area of the white fur is. The fourth distinction is that the mouth frowns—more than a cat or kitten, and much less than the tiger and cougar. So, this should help us do a lion that will have these four elements in such a way that the final work will “read” lion.
To “read’ art is a way of seeing a work of art in a totality of the design. I was always fascinated by an art critique who looked closely at realistic paintings, and pointed out that in the nooks and crannies were pieces of abstract art. Those scribbles of paint “read” as lace or a jewel from a distance. As face painters, we do this kind of work all the time, and our little scribbles become reflections, tears, and anything else we want. So, let’s translate to a child’s face.
Painting the Lion Face
I use the following Mehron Liquid Face Paint and Mehron Fantasy FX colors:
White Mehron Liquid
Brown Mehron Liquid
Tan (a mix of Brown Liquid & White Mehron Fantasy FX)
Yellow/Tan (a mix of Tan and Yellow Mehron Liquid)
Black Mehron Liquid
Grey Mehron Liquid
Pink Mehron Liquid (for touching a bit at the end of the nose)

Start with the white. That goes under and over the eyes, and under the nose, and on the chin. (Photo 1) Remember, the chin and mustache hair does not flair out like a cat. Then, sponge on yellow/tan on all uncovered areas. This yellow tan is not on your standard palette. You have to make it. Without it, your lion will come out looking like a tan cat. (Photo 2) Then, I mix a Lion Brown, and sponge it as triangles over the nose, and around the edges of the face. (Photo3). Note. too, that the white under the lion’s eyes stand out more than the others Pantheras. Then, use a fine black brush to put on the lines around the eyes, trying to avoid the “Sharp” look. Extend the nose by making the nostrils outside of the kid’s nose.

Then add dimensions by putting “feather touch” black hairs to shade the black. (Photo 4). Finally, touch up the brown adding depth to the face. Using liquid white, gray, and black I add fine whiskers. (Photo 5). If you are lucky to have one, this is when you put the wig from the Wizard of OZ on their head!
 Here is a modification with a “happier” mouth, while in the above design, I was trying to reproduce a real Lion look as much as I could. Here is a modification with a “happier” mouth, while in the above design, I was trying to reproduce a real Lion look as much as I could.
This version also has glitter. While not essential, glitter is a great finishing touch to almost any design.
Good luck, and write to me through my Entertainer’s Page if you have questions or problems, or specific areas you would like me to discuss.
|
|
|
How to Face Paint Spiderman
|
|
by Marc Kohler
|
|
|
|
Spiderman is one of the most popular face paint designs for boys (along with the Hulk, Skulls, Vampires, Dragons, Pirates, etc.) Today, I am going to show you the nooks and crannies of the Spiderman face to make it as easy for you to do it. As with any of the articles that you read here on facepaint.com, I will discuss general ideas which you can use in your work.
There are two basic styles of face painting full faces. Americans, who have had our craft come out of theatrical make-up, tend to sponge on a base coat first. The base coat can be one color, several colors, or even several colors that overlap. Then, we put the details “on” the base coat. So, when you take a theatrical make-up class here in the States, that is how they will start. In Europe, on the other hand, a different tradition of face paining came about as a result of their “theatre” coming out of a very much older tradition of religious masks and painted faces. Tony van Renterghem, in When Santa Was A Shaman: Ancient Origins of Santa Claus & the Christmas Tree suggests that Santa was a pagan image made to honor the seasons, the discovery of fire, and religion of celebration. Santa is just one mythological figure that was played by dancers in masks and make-up. The masks inspired a different way of painting faces. The style that evolved was to use no base cost, but to paint the face in sections of color. These “parts” had no background color to alter their color making them more vivid than the stage make-up used in the US.
One great example of this European Style is the work of Brian and Nick Wolfe. If you see any of their books, you will find that bold colors are applied separately, so each section has no color behind it. That is the reason that faces in books published in Europe seem brighter than ones here. In fact, even though I cannot read the languages, I have bought quite a few foreign language face painting books. While I cannot read the words, the pictures demonstrate the power of this sectional kind of painting.
Spiderman Face Paint
 |
Spiderman works best in a combination of the European Style (ES) and the American Style (AS). You see, if we put a red base coat, then the white eyes will be difficult. If we put the red base coat on first, and leave spaces for the eyes, the chances are great that when the white goes on, it will catch the red and make pink in the eyes, so, we use both methods. Following ES, I brush on the pointy eyes first, using a #4 to #8 round brush. This is a stronger and clearer way to make sure that they are the same size, symmetrical, and look great! The size depends on our ability to control the flip of the eyes. You will have to be careful around the eyes – in theatrical make-up we do the whole eyelid which I try to do in my face painting. Do not try this, though, if you cannot guarantee that you will not hit the eye. If you study Spidey’s eyes, you will find that pretty much are always in the same place, so practice hitting the right size and placement by practicing on paper.This DPW (Department of Public Works? Nope, in face painting, DPW is Draw-Paint Work) will really help anything you later. Spend at least a half hour to an hour a day drawing and sketching – it does not matter what you sketch or draw, what matters is that your hand and eye coordination grows. The results do not matter, what matters is your commitment to you learning – it will last forever. |
 |
Using your brush, carefully line around the eyes, and make a small mask between them with your red. This will make the next step much easier to do, because the red will never touch the white. |
 |
With a sponge, you can do the red base coat now. I know some painters leave the chin or the cheeks undone, but I think it makes the face too much like a mask, and Spiderman definitely does not wear a mask. Applying the paint with the sponge requires lots of work. I start with the chin, forehead, and the bridge just above the nostrils, putting a spot at each point. I then work the paint around the face aiming for an even color. Spread the paint out slowly. Your goal is to make one light, but solid red coat over the whole face, which requires practice. A sponged face that is not even covered will “read” to the viewer as a skin condition. “Read” is a term to describe what the colors in a painting look like to the viewer when looked at from a distance. |
 |
The next step is to line the whites of the eyes with black. Here is a another little “cranny” that you can make your own. The style of these black lines around the eyes can be done “quietly”, and be so subtle as to almost not show. They can also be done with a flourish which makes Spidey’s eyes pop. |
 |
The quality of the webbing determines the excellence of the face, so use a fairly fine brush. Check out some Spiderman pictures online. See how the web spokes go straight, and the “arcs” differ around the face? Paint eight spoke lines, skipping over the white eye patches: 2 between the eyes, 2 short ones going from the sides of the eyes up towards the temples, 2 running under the white eye to just between the jawbone and the chin, and the last 2 from between the eyes down on both sides of the mouth to the chin. (See Photo 4).
Now, paint the arcs connecting the spokes. (Photos 5). |
 |
If you look at the current pictures of Spiderman, you will see that his webs are not black, they have gray highlights on them. I add these since most of the Spidermen I have painted recently when asked, said that the web was grey. You can get away without the gray, but don’t be surprised if a child asks for it.Is this enough? Are we done? Yes and no. I ask the child if they want special Spiderman eyes – glitter!! Some kids will like it, and some won’t. I use liquids and creams so, usually, there is enough moisture to stick on the glitter. If you use cake face paints, then you might need to apply some white paint or mist the area lightly with water to help the glitter stick. |
|
One last note. sometimes girls will ask for Spiderman of a different color. You can even offer it or have on your poster. The technique is the same, regardless of what base color you use – I have done Spidey’s pink, light blue, and orange. You might also get asked to make a Venom. To paint Venom, after the white eyes in place brush on the black “mask” very lightly – make the black as thin as you can get away with so the webbing will really stand out and make it look good. |
|
|
|